Hand-to-hand combat complexes with and without weapons. Rules for recording specific exercises and compiling complexes Exercises with a gymnastic stick
Knowing the terminology, it is easier to compose and record exercises. To record a SPECIFIC EXERCISE you must:
Determine the starting position - for example, stand, legs apart, arms to the sides.
Indicate the actual movement - rotation, tilt, etc.
Indicate the direction of movement - right, left, back, etc.
Set a count for the movements (as a rule, the exercises are performed on a count that is a multiple of 4: 4, 8, 16 counts to allow the exercise to be performed to music).
Specify end position. As a rule, the starting and final positions coincide, otherwise it will be inconvenient to perform the exercises several times in a row.
Example of recording a specific exercise.
I.P. – main stand.
1-2 tilt to the right, arms up.
However, the exercise makes sense when used in a set of exercises. The ORU complex is a logically thought-out sequence of exercises of a general developmental nature. Before you begin selecting exercises, you need to determine its PURPOSE. It can be intended for morning hygienic exercises, for complex or targeted development of physical qualities, for the formation of posture, etc.
Knowing the focus of the complex, it is necessary to decide which exercises and in what sequence should be included in the complex. Specialists of St. Petersburg State University of Physical Culture named after. P.F. Lesgaft offer the following typical diagram of the sequence of outdoor switchgear in the complex.
Exercises such as stretching (to straighten the spine, activate breathing).
Exercises for leg muscles (squats).
Exercises for the trunk muscles in the anteroposterior direction (bending forward and backward).
Exercises for arm muscles.
Exercises for the oblique muscles of the trunk (side bends, turns, rotations).
Complex exercises in sitting (lying down) positions involving the abdominal and back muscles.
Stretching exercises.
Jumping with transition to walking.
It should be noted that for outdoor switchgear a certain dosage of exercises is adopted - at least 2-3 exercises for each of the indicated points.
The approximate outdoor switchgear complex given below without items for morning hygienic exercises can become the basis for composing other sets of exercises. If you follow the rules for composing a separate exercise, the order of including exercises in the complex, the selected dosage, counting, as well as correctly placed emphasis on the dominance of certain exercises depending on the task being solved, its use will be effective.
Table 1
An approximate oru complex without items for ugg (morning hygienic gymnastics)
|
№ p/p. |
Dosage |
Guidelines |
|||||||||||||||||||||||||||||||||||||||||||||
|
I.p. – o.s. 1 – arms to the sides 2 – hands up, rise on toes 3 – arms to the sides |
The pace is calm keep balance |
||||||||||||||||||||||||||||||||||||||||||||||
|
1-4 – circular movements of the head to the right 5-8 – the same to the left |
The pace is slow perform without sudden movements |
||||||||||||||||||||||||||||||||||||||||||||||
|
I.p. – stand, legs apart, hands on waist 1-3 – three spring forward tilts |
Perform the tilt with a straight back, looking forward |
||||||||||||||||||||||||||||||||||||||||||||||
|
I.p. – stand, legs apart, hands on waist 1 – tilt to the right, arms up 3-4 – the same to the left |
Tilt exactly to the side, arms straight |
||||||||||||||||||||||||||||||||||||||||||||||
|
I.p. – o.s. 1 – half squat, arms forward 3 – squat, arms to the sides |
Back straight, breathing don't delay |
||||||||||||||||||||||||||||||||||||||||||||||
|
I.p. – stand, arms up 1 – right swing forward, arms down 3-4 – the same left |
Legs during the swing do not bend, back straight |
||||||||||||||||||||||||||||||||||||||||||||||
|
I.p. – stand, hands on waist 1 – jump, legs apart, arms to the sides 2 – jump, legs crossed, arms up 3 – jump, legs apart, arms forward |
With every execution try to increase the pace |
||||||||||||||||||||||||||||||||||||||||||||||
|
I.p. – o.s. 1-2 – stand on your toes, arms up, inhale 3 – half-bend forward, arms down, exhale |
Restore your breathing On the count of 3 – relax I-III class 1. I. p. - feet shoulder-width apart, arms freely lowered: 1- 3 - raise your arms up, stand on your toes, stretch (inhale), 4- 6 - relax your muscles, return to i. n. (exhale). Perform the exercise 3-4 times. 2. I. p. - o. p.: 1-sit down, relaxing the muscles of the torso and lowering your arms freely down, 2-maintain the accepted position (exhale), 3-return to i. p., 4 - pause (inhale). Perform the exercise 4-5 times. 3. I. p. - o. s., arms to the sides. 1-2 - circles with arms forward, the same, back. Options: successive circles (one hand behind half a circle), large simultaneous circles, alternating them with medium circles forward and backward (elbows pressed to the body), large counter circles with body turns. 4. I. p. - stand - legs apart: 1 - tilt to the right, the right hand slides down the thigh; the left one, bending, slides up the body, 2 - and. p., 3-4 - the same, in the other direction. Options: the same, doing two springy inclinations without stopping and and. P. 5. I. p. - stand - legs together, arms to the sides: jumping. Options: complete the exercise with upward movements of the arms. After jumping - walking in place. 6. I. p. - stand - legs together, hands on the belt: 1 - right leg forward, 2 - to the side, 3 - back, 4 - put it down. The same with the left foot. Variations: the same, with arm movements forward, to the sides, forward and to the waist. IV-VI class 1. Walking in place with vigorous arm movements. Options: walking, raising your knees high; walking with changes in pace; alternating walking and running in place. 2. I. p. - o. p.: 1 - arms to the sides; 2 - arms up, stretch, 3 - arms to the sides, 4 - arms down. Variations: the same, rising on your toes, to the count of “2”. The same thing, taking a step to the side on the count “1” and placing your foot on the count “4”. 3. I. p. - wide stance - legs apart, hands on the belt: 1 - squat on the left leg, arms forward, 2 - i. p., 3-4 - the same, squatting on the right leg. Options: spring squats 2-3 in a row. 4. I. p. - stand - legs apart, hands on the belt: 1 - bend forward 2 - straighten up, 3 - bend back, 4 - i. p. Options: two springy bends forward and backward, on the count of “2” - repeat bending forward, bending over, arms to the sides. 5. I. p. - o. s., arms to the sides: 2 circles with arms forward, the same, back. Options: successive circles (one hand behind half a circle), large simultaneous circles, alternating them with medium circles forward and backward (elbows pressed to the body), large counter circles with body turns. 6. I. p. - stand - legs apart: I - tilt to the right, the right hand slides down the thigh, the left hand, bending, slides up the body, 2. p., 3-4 - the same, in the other direction. Options: the same, doing two springy tilts without stopping in and. P. 7. I. p. - stand with legs together, arms to the sides: 1 - jump legs apart, arms down, 2 - jump legs together, arms to the sides. Options: complete the exercise with upward movements of the arms. After jumping - walking in place. 8. i. n. - stand - legs together, hands on the belt: 1 - right leg forward, 2 - to the side, 3 - back, 4 - put it down. The same with the left foot. Variations: the same, with arm movements forward, to the sides, forward and to the waist. VII-VIII class 1. Walking in place with vigorous arm movements. 2. I. p. - o. s.: 1 - step with your left foot to the side, hands to your shoulders, 2 - hands up, stretch, 3 - hands to your shoulders, 4 - put your foot, hands down. Options: the same, rising on your toes, at the count of “2”, at the count of “1” clench your hands with force in your fists, and at the count of “2” spread your fingers wide. 3. I. p. - stand - legs together, hands on the belt: 1 - right leg to the side, 2 - lunge with the right to the right, 3 - pushing off with the right, stand on the left, right to the side, 4 - place the right foot. Options: supplement the exercise with arm movements to the side. 4. I. p. - o. s.: 1 - bend forward with a straight torso, arms to your shoulders, 2 - straighten up, arms down. Options: bending over to the count of “1” with your hands behind your head. 5. I. p. - stand - legs together, arms to the sides: 1-2 - two circles with arms downwards, 3-4 - two circles with arms up. Options: on the count of “3” - forcefully bend your arms towards your shoulders, squeezing your hands into fists, on the count of “4” - to the sides. 6. I. p. - stand - legs apart, hands on the belt: 1 - right arm to the side with the body turned to the right, 2 - i. p., 3-4 - the same, in the other direction. Options: two springy turns to the right and left without stopping at and. p., turns the body with arms spread to the sides, palms up, jerking them back. 7. I. p. - stand - legs together, arms to the sides: 1 - bend the right leg in front, 2 - i. p., 3-4 - the same, bending the left leg. Variations: arms forward, palms down. 8. I. p. - stand - legs together, hands on the belt. Jumping on two legs with turns of 90 and 180°. Options: turn every second jump; alternate turns; after jumping - walking in place. 9. I. p. - stand - legs apart: 1 - hands behind the head, 2 - left hand up, right hand forward, 3 - hands behind the head, 4 - hands down. The same, changing the position of the hands to the count of “2”. Options: arms to the sides, alternating movements of the arms to the sides, up, to the sides and down, starting with the right hand (the left one lags behind by one count). The same, the left hand is turned on sequentially (for four counts).
Contents of the 1st complex: 1. Walk slowly. Breathing is uniform; 2-3 steps - inhale, 3-4 - exhale. Keep your head and torso straight. Hands perform free movements. (Load dosage 20-30 seconds). 2. Stretching. From IP - basic stance, hands to shoulders, elbows down, for 2 counts (to yourself) raise your arms up - to the sides, bend in the thoracic part of the spine and rise up - inhale. For 2 subsequent counts (but more slowly), lowering your arms to the starting position and tilting your head forward - exhale. (Load dosage from 5-6 to 9-10 times). 3. Tilts to the side. I.p. - basic stance, feet shoulder-width apart, hands to shoulders, elbows slightly pressed, chest forward for 2 counts, tilt the torso to the left, raise your arms up, look up - inhale, for the next 2 counts return to the I.P. The same - in the other direction. (Load dosage from 9-10 to 13-14 times). 4. Squats. I.p. – o.s. Feet width apart, toes parallel. For 2 counts, slowly bending your knees and spreading your knees to the side, lower yourself into a half-squat, resting on your full foot, arms forward, palms down. Straighten up for 2 counts. When lowering, exhale; when straightening, inhale. (Load dosage from 9-10 to 13-14 times). 5.Walking is calming. Relax your arms and shoulders, breathe deeper. (Load dosage 45-50 seconds). 6. Rotation of brushes. I.p. – o.s., arms to the sides, hands clenched into a fist for 4 counts, circular movement of the hands up – back – down – up. For the next 4 counts, make circular movements in the opposite direction. Stay straight, bend over, breathe freely. (Load dosage from 6-7 to 9-10 times. At the beginning, perform at an average pace, then more slowly and with great effort). 7. Touching the floor with your foot. I.p. – o.s., right leg in front on the toe, hands on the belt, torso straight. For 7 counts, alternately touch the floor with your heel and toe. At the count of 8, place your foot. The same with the left foot. Breathing is voluntary. (Load dosage from 4-5 to 6-7 times). 8. Running in place. (Dosage 140 steps in 1 minute, 2-3 minutes). 2. Flexion and extension of the arms. I.p. – legs apart, hands in front, fingers intertwined with palms facing out. 1- forcefully bend your arms, place your hand on your chest, palms inward – inhale. 2 – forcefully straighten your arms in an i.p. - exhale. (Load dosage 13-14 times) 3. Raising on your toes. I.p. stand next to some object, the front of the foot on the edge of a board 3-4 cm thick. 1-8 alternately raising and lowering on the toes, arms forward. 9-16 – calm walking in place with deep breathing. (Load dosage from 5-6 to 7-8 times). 4. Side bends. I.p. – o.s., legs apart, arms to the sides. 1-2 bends to the left, left hand behind the back, right hand behind the head - exhale. 3-4 – i.p. - inhale. The same - in the other direction. When tilting to the left, bend your right leg; when tilting to the right, bend your left leg. (Load dosage from 10-11 to 13-14 times). 5. Squats. I.p. – stand with your right side to the back of the chair, put your right hand on the back, your left hand on your belt. 1-2 – squat on your right leg, left leg forward (bent or straight) – exhale, 3 – place your left leg next to your right, 4 – stand up and turn to the chair with the other side – exhale. The same thing - with the other leg. (Load dosage from 5-6 to 7-8 times, deep squat, swing leg straight). 6. Walk slowly. (Load dosage 30-40 seconds) 2. Stretching. I.p. – standing, feet shoulder-width apart. On 1-2 (count) - take your arms back to the sides, turning your palms up, bend tensely in the thoracic part of the spine, rise on your toes, look up, take a deep breath: on 3-4 (count) return to IP. – relax, lower your shoulders and head slightly forward – exhale. (Load dosage from 10 to 12 times). 3. Tilts to the sides. I.p. – feet shoulder-width apart. 1-2 - springy tilt to the left, right hand swing to the side - up above your head, left hand behind your back: 3-4 - changing the position of the hands, springy tilt to the right, breathing arbitrarily. (Load dosage 12-13 to 14-15 times in each direction, possibly with a pause, with a large amplitude). 4. Walk calmly with deep breathing. (Load dosage up to 1 minute) 5. Tense deflection. I.p. – standing with your back to two chairs arranged (with seats). 1 – place the shin of your left leg on the seat of a chair, pull your toe, hands on the back of the nearest chair; 2-3 bending tensely, lean forward (back), move your hands to the back of the far chair, actively helping the bending, - inhale; 4 – i.p. - exhale. The same with the right foot. (Load dosage from 4-5 to 6-7 times with both legs). 6. Breathing exercise. I.p. – o.s., left hand on the chest, right hand on the stomach; 4 times - abdominal breathing, 4 times - chest breathing, 4 times - mixed breathing. (Load dosage 3-4 times) 2. A set of physical training pause exercises 2. I.p. – stand with legs apart. 1 - arms to the sides, turn your head to the left, 2 - rise on your toes, tilt your head back, arms up, palms inward, 3 - turn your head to the right, arms to the sides, 4 - i.p. (8-10 repeats). 3. I.p. - hands behind head. 1 – turn the body to the right, arms to the sides, 2 – IP, 3-4 – the same to the left, 5 – half-squat, arms up, 6 – IP, 7 – half-squat, arms forward, 8 – i. P. (4-6 repetitions). 4. I.p. – arms bent at the elbows. For each count, “shaking” the brushes (for 16-32 counts). 5. I.p. – hands to shoulders. 1 – half squat, left arm up, right arm forward, turn the head to the right, 2 – ip., 3 – half squat, right arm up, left hand forward, turn the head to the left, 4 – ip. (4-6 repetitions). Take the position of correct posture and maintain it for 5-6 seconds. 3. A set of gymnastics exercises before classes On command, take the position of correct posture and maintain it for 5-6 seconds. 1. Walking in place with legs raised high, maintaining correct posture (32-48 counts). 2. I.p. – stand with your feet apart and your hands behind your head. 1-2 – tilt the torso back, arms to the sides – inhale, 3-4 – i.p. – exhale (8 repetitions). 3. I.p. – wide stance with legs apart, hands on the waist. 1 - turn the body to the right, bending the right hand, arms to the right, 2 - the same to the left (6-8 repetitions). 4. I.p. - hands on the belt. 1 – lunge to the right, arms to the sides, 2 – IP, 3 – half squat, arms up, 4 – IP, 5-8 – the same to the left (4-6 repetitions). 5. I.p. – crouching emphasis. 1-2 – stand, right back on your toes, arms up, bend over – inhale, 3-4 – i.p. – exhale, 5-8 the same, left back (4-6 repetitions). 6. I.p. – walking in place, maintaining correct posture (32-48 counts). While walking in place, take 4 steps with your arms up at your sides and inhale, for the next 4 steps with your arms down and exhale. (4-6 repetitions). 7. I.p. – o.s. 1 - right hand to the right on the toe, left hand up, right hand forward, 2 - IP, 3-4 - the same with the left hand in the other direction with a change in the position of the hands. (4 reps). 4. A set of exercises to develop postureWe offer a set of gymnastic exercises to prevent osteochondrosis.The exercises of this complex can be performed from 1 to 6 times a day, repeating each of them 4-5 times at a slow pace, until pain is severe (if any), with the maximum possible range of motion. When performing exercises, pull your toes towards you. At the end of each movement and at the end of each exercise (where possible), static tension should be applied. At first, the tension should be from two to four seconds, gradually increase it to 8-10 seconds. When releasing tension, you should exhale completely with sound.
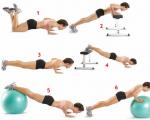
As a rule, with age, as a result of weakening of the muscles of the legs and torso, incorrect or forced position of certain parts of the body at work or at home, posture worsens. Constant use of special selected exercises will help maintain correct and beautiful posture for many years. I.p. – hands down into the lock. 1-2. Hands up - down, rise on your toes, bend over. 3-4. I.p. I.p. – standing at a support, hands on the support. 1-2. Rise on your toes, bend over, spread your shoulders. 3-4. I.p. I.p. - hands on the belt. – 1-2. Half bend forward, rise on your toes, look forward. 3-4. I.p. I.p. - stick from behind, gripping the ends from below. 1-2. Bend forward, bending, take the stick back - up. 3-4. I.p. I.p. – a stick on the shoulder blades, gripping the ends. 1-2. Tilt to the left. 3-4. I.p. 5-8. Same to the right. I.p. – standing with your back to the wall at a distance of a step. 1-4. Bend back, arms up and back with support on the wall, bend over, head back, look at your palms. 5-8. I.p. I.p. – o.s. 1-2. Sit on your toes, hands back behind your back. 3-4. I.p. I.p. - emphasis lying on your stomach. 1-2. Straighten your arms, bend over. 3-4. I.p. I.p. – emphasis sitting in the back. 1-2. Bend over. 3-4. I.p. I.p. - sitting on the floor. Lie down on a support (bench). 1-2. Bend over backwards. 3-4. I.p. I.p. - lying on the floor on your stomach in front of the gymnastics wall. 1-2. Using your hands to move the slats from bottom to top, bend over. 3-4. I.p. 5. A set of exercises to regulate body weight 6. A set of exercises to develop the physical quality “flexibility”: Exercise 1. I.p. – standing, feet shoulder-width apart. 1-4 - head tilt to the right, the same in the other direction. Repeat 2 times. Exercise 2. I.p. – standing, feet shoulder-width apart. 1-4—tilt the head forward, trying to “curl up,” as it were. Same thing back. Repeat 2 times. Exercise 3. I.p. – standing, feet shoulder-width apart. 1-4 turn the head to the right. Exercise 4. I.p. – standing, feet shoulder-width apart. 1-4 – circular rotation of the head to the right. The same in the other direction. Repeat 2 times. Shoulder joints. The shoulder girdle takes part in respiratory movements; the high mobility of its joints affects the amount of inhalation and exhalation. In addition, good mobility in the shoulder joints is extremely important for maintaining correct, beautiful posture. Exercise 1. I.p. – standing, feet shoulder-width apart, arms to the sides. 1-7 – “hug yourself by the shoulders, trying to raise your elbows higher and move your fingers as close to the spine as possible. 8-i.p. Repeat 8 times. Exercise 2. I.p. - standing at a distance of a step, facing the back of a chair, feet shoulder-width apart. 1-7 - leaning forward, place your hands on the back of the chair and, without bending your elbows, stretch your shoulder joints to the floor; 8 - i.p. Repeat 8 times. Exercise 3.I.p. – standing, bend your right arm with your elbow up so that your fingers touch your shoulder blade. 1-7 - pressing with your left hand on the elbow of your right, try to lower your palm lower; 8 – change the position of your hands. Repeat 4 times. Exercise 4. I.p. – standing, feet shoulder-width apart, arms forward. 1-7 bend your right hand to the glue shoulder, take your right elbow with your left, pressing on it, try to bring your right hand closer to your left shoulder; The same in the other direction. Repeat 4 times. Exercise 5. I.p. – standing with his arms crossed behind his back. 1-7 – grab the elbow of the other hand with one hand; 8 – i.p. Repeat 8 times. Exercise 6. I.p. – standing, clasp your lowered hands behind your back. 1-7 – turn your shoulders, trying to bring your elbows closer to each other; The same with raising the intertwined hands back. Repeat 8 times. Exercise 7. (performed with a jump rope folded in four; rubber band). I.p. – standing, feet shoulder-width apart, pick up a jump rope. 1-4 – raise your arms up and, without bending your elbows, move them back (pulling the rope) 5-8 – the same in reverse order. Repeat 6 times. The distance between the hands can be gradually reduced. Elbow joint. Its natural mobility, as a rule, is sufficient for most people and does not require special training. However, in people with highly developed muscles, full extension in the elbow joint is often impossible, which is associated with an increase in the tone of the forearm flexor muscles. On the contrary, in people with poorly developed muscles, even hyperextension can be observed in this case. Spine The flexibility of the entire human body is largely determined by the mobility of the spine. It is the spine that is more susceptible to age-related changes associated with limited mobility. This is expressed by the beginning fusion of the vertebrae, and bone “whiskers” appear between them. Negative phenomena are also intensified as a result of a sedentary lifestyle, when the spine experiences no less overload than when lifting excessive weights. Exercise 1. I.p. – standing in a horizontal forward bend, legs apart, hands on your knees; 1-2 - raise your lower back, lower your head, round your back; 3-4-lower your lower back, raise your head, bend over. Repeat 16 times. Exercise 2. I.p. – Sitting, legs bent with knees up, chest pressed to hips, hands on heels; 1-4 - try to straighten your legs without lifting your torso from your legs; 5-8 – return to IP. Repeat 12 times. Exercise 3. I.p. – lying on your back, arms along your body. 1-4 - place your feet on the floor behind your head; 5-8 - return to IP. Repeat 12 times. Exercise 4. I.p. – lying on your back, arms along your body. 1-4 – bend in the chest, leaning on your elbows and without lifting your pelvis and head from the floor; 5-8 – return to IP. Repeat 16 times. Exercise 5. I.p. – lying on your stomach, legs apart, bent, hands holding your feet; 1-4- try to straighten your legs, lifting your upper body; 5-8 return to IP. Repeat 12 times. Exercise 6. I.p. – lying on your back, legs slightly apart, arms along the body; 1-2 – move your torso to the right without lifting your back from the floor; 3-4 – return to IP. Exercise 7. I.p. – sitting, legs as wide apart as possible, hands behind your head. 1-2 - tilt your torso to the right, trying to touch the floor behind the knee of your right leg with your elbow; The same in the other direction. Repeat 16 times. Exercise 8. I.p. – lying on your back, hands behind your head, legs bent with your knees up. 1-2 – tilt your knees to the right, trying to touch the floor with them, and your head to the left; The same in the other direction. Repeat 16 times. Exercise 9. I.P. – sitting, legs bent apart, feet on the floor, arms bent in front of the chest. 1-2- turn your torso to the left, touch your left knee with your right elbow, take your left hand as far back as possible and place it on the floor; The same in the other direction. Repeat 16 times. Exercise 10. I.p. – standing – legs apart. 1-4- - circular movements of the body to the right; 5-8 - the same in the other direction. Repeat 16 times. Hip joint. The largest in the human body. It is the attachment point for large, well-developed muscles. These muscles enable a person to perform a variety of movements - running, jumping and many others. Mobility of the hip joint is also important for developing the correct position of the pelvis, and therefore posture. Exercise 1. I.p. - lying on your back.
Exercise 2. I.p. - sitting. 1-3 – lean forward, trying to touch your chest with your legs, arms forward, do not bend your knees; 4 – i.p. Repeat 16 times. Exercise 3. I.p. - sitting on your knees and heels. 1-3- straighten up and bend over, trying to bring your hips forward as much as possible; 4 – i.p. Repeat 12 times. Exercise 4. I.p. – standing on your left knee, right leg bent in front, hands on your right knee. 1-3 – move the left thigh and pelvis forward and down; The same with the other leg. Repeat 16 times. Exercise 5. I.p. – standing with your right side to the chair, holding the back. 1-3 – squatting on the left, move the right one as far as possible to the side, the body is vertical; The same to the other. Repeat 12 times. Exercise 6. I.p. – wide stance, hands on hips. 1-3 – half squat on the right, bend forward; The same to the other (Fig. 69). Repeat 16 times. Exercise 7. IP - sit your legs apart, palms in front of you on the floor with your fingers suddenly facing each other. 1-3 lean forward, trying to put your elbows on the floor; 4-i.p. Repeat 16 times. Exercise 8. I.p. – wide stance. 1 – bend forward, place your palms on the floor; 2 – spread your heels to the sides; 3 – spread your socks to the sides; 4 - spread your heels to the sides; 5 – move your heels inward; 6 – move the socks inside; 7 - move your heels inward; 8 - i.p. Repeat 10 times. Exercise 9. I.p. – emphasis sitting behind, legs bent apart. 1 – lower your right knee inward, trying to touch the floor with it; The same with both legs at the same time (Fig. 72) Repeat 16 times. Exercise 10. I.p. – sitting, legs bent, feet together, knees apart. 1-3 – resting your hands on your knees, lower them as low as possible to the floor; 4 – i.p. (Figure 73). Repeat 16 times. Knee-joint Its mobility in most people is usually satisfactory. At the same time, there are cases of underextension in the knee joints, as well as overextension in them. In the latter case, the knee joint becomes especially vulnerable to injury due to sudden tension or an unsuccessful landing after jumping. Often, without receiving sufficient loads, the joint is rebuilt. To avoid this, it is necessary to strengthen the joint by constantly exercising it. However, you should not get carried away with deep squats. This can lead to overload of the knee joint. Exercise 1. i.p. – standing, hands on the belt. 1-2 – sit down without lifting your heels from the floor (the angle between the thigh and shin is 90 degrees); Exercise 2. I.p. – standing, right leg in front, left leg behind. 1-3- bending the right leg, lunge on it, hands on the knee; 4 – i.p. The same in the other direction (Fig. 78). Exercise 3. I.p. – emphasis sitting in the back. Bend your legs one by one, imitating riding a bicycle (Fig. 79). Exercise 4. I.p. standing, hands on the belt. 1-2-half squat, horizontal circle with knees to the right; 3-4-i.p. The same in the other direction (Fig. 80). Exercise 5. I.p. – lying on your back, legs bent up, hips vertical, knees horizontal. 1-2 – circular movement of the shin to the right. The same to the other (Fig. 81). Exercise 6. I.p. narrow stance, hands on the belt. 1 – 2 – squatting, bring your knees together in front; 3-4 i.p. (Fig. 82). Exercise 7. I.p. - standing on your knees, hands on your belt. 1-2 - sit to your right; 3-4-ip. The same in the other (Fig. 83). Exercise 8. I.p. – on your knees, toes apart, hands on your belt. 1-2 - sit on the floor between your socks; 3-4-i.p. (Fig. 84). Exercise 9. I.p. – sitting, legs crossed. 1-2 - stand up without using your hands; 3-4-i.p. (Fig. 85). Ankle joint. To improve the mobility of the ankle joint, the elasticity of the muscles of the lower leg and foot, we perform special exercises. Exercise 1. I.p. – emphasis sitting in the back. 1 – “take” the socks; 2 – return the socks, trying to touch the floor with your thumb. Repeat 16 times. Exercise 2. I.p. - Same.
4 – i.p. Same with the other one. The same with inward rotation of the foot (Fig. 90). Each rotation is 4 times one and the other. Exercise 3. I.p. – o.s.. 1- bend your right leg onto your toes and move your heel forward (the load is distributed evenly across all toes); 2 – IP. Same with the other leg (Fig. 91) Repeat 16 times. Exercise 4. I.p. – narrow stance, hands on the belt. 1 – rise on your toes as high as possible; 2 – i.p. (Figure 92). Repeat 16 times. Exercise 5. I.p. – sitting on your heels, toes pointed out.
1 – try to lower your heels as far down as possible; 2 – i.p. (Figure 94). Repeat 16 times. Exercise 7. I.p. standing facing the back of a chair in a lunge position with support from your hands. 1 – bending your standing leg behind you, stretch your knee to the floor, do not lift your heels off the floor; 2 – i.p. The same with the other leg (Fig. 95). Repeat 16 times. Exercise 8. I.p. – o.s.
Exercise 10. I.p. - narrow stand. Jumping on legs straightened at the knees, pushing off with the foot (Fig. 98). Repeat 24 times. 7. A set of exercises to develop the physical quality “coordination” I.p. – hands to shoulders. 1. Left forward on the toe. 2. I.p. 3-4 the same with the right. I.p. - hands on the belt. 1-2. Left leg forward on the toe (in line with the right leg), left arm to the side, head to the left. 3-4. I.p. 5-8. The same with the right leg. I.p. – o.s. 1-4. Balance on the right (“swallow”). 5-8. I.p. 9-16. The same on the left. I.p. - hands behind head. 1-2. Left foot forward. 3-4. Hold. 5-8. I.p. 9-18. From the right foot. I.p. – left in front of right (on the same line). 1-2. Tilt to the left, right hand under the armpit. 3-4. I.p. 5-8. Same to the right. I.p. – left in front of the right, hands to shoulders. 1-2. Turn your torso to the right, arms up. 3-4. I.p. 5-8. Turn your torso to the left. I.p. – arms up, heels and toes together. 1-2. Bend forward to the left, touching the floor near the heel of your left foot. 3-4. I.p. 5-8. Same to the right. I.p. - crouching down, holding your ankle joints with your hands. 1-2. Straighten your legs, head down. 3-4. I.p. I.p. - on my knees. 1-2. Standing emphasis (straighten your legs), rise on your toes. 3-4. I.p. I.p. – hands to shoulders. 1-2. Swing your right hip up, rise onto your left toe. 3-4. I.p. 5-8. Same for the left. I.p. - hands on the belt. 1-2. Bend your left back to the right, and grab your toe with your right hand. 3-4. I.p. 5-8. The same with the other leg. I.p. – stick with a grip at the ends from below. 1-2. Hands up, place the toe of your left foot on the knee of your right. 3-4. I.p. 5-8. The same in the other direction. I.p. – hands up into the lock. Walking on your toes with your eyes closed. I.p. – o.s., stick horizontally at the bottom with a grip at the ends. 1-2. Stick forward, up - take a deep breath. 3-4. I.p. – exhale (4-8 times). I.p. – o.s. 1-2. Hands up from the sides up behind your head, bend over - inhale. 3-4. Tilt to the side - exhale. 5-8. I.p. – exhale (4-8 times). I.p. – o.s. 1. Right to the side, arms to the sides - inhale. 2. Tilt, hands to toes - exhale. 3. Count 1 – inhale. 4. I.p. - exhale. (4-6 times) I.p. – o.s. 1-2. Hands up, right back, bend over - exhale. 3-4. Deep squat - exhale. 5-6. Count 1-2 – inhale. 7-8. I.p. - exhale. (3-4 times) I.p. – emphasis while standing on your knees. 1-2. Left swing back – inhale. 3-4. IP, head forward - exhale. 5-8. The same with the right (3-4 times with each leg). I.p. - sitting on the floor. 1-2. Bend forward - exhale. 3-4. I.p. – inhale (4-6 times) I.p. – emphasis lying on bent arms. 1-2. Bend over, inhale. 3-4. I.p. - exhale. (4-6 times) I.p. - lying on your back. 1-2. Group - exhale. 3-4. I.p. - inhale. Methodical instructions: exercises are performed calmly, pay attention to inhalation and exhalation in combination with movement. Walk quietly for 20-30 seconds between exercises. Accelerated walking 100-150 meters, calm walking 100 meters. Easy run 50-80 meters.
In summer it is useful to walk on sand and gravel. In winter, you can use a box or basin with sand and gravel.
Hand-to-hand combat view The event is conducted in accordance with the Manual on Physical Training and Sports in the Armed Forces of the Russian Federation (NFP-2009). A set of hand-to-hand combat techniques - exercise No. 29 (RB-3), a set of hand-to-hand combat techniques without weapons for 8 counts - exercise No. 30 (NFP-2009). In the demonstration of safety actions, a complex without weapons, a team consists of 6 people (of which at least one is a girl). Team members who have performed safety actions using the ticket system participate in the demonstration of RB techniques. In case of denial of admission to RB receptions, the assessment of receptions is carried out as follows: from 5 points for each RB reception from tickets for admitted participants and from 3 points for each RB reception from among the remaining tickets. Self-insurance by fall. Self-insurance techniques protect against bruises on the ground during combat with an opponent. Participants who did not perform safety actions, as well as those who received “0” points for performing safety actions, are not allowed to perform RB techniques. If 2/3 of the team members fail to perform safety actions, teams are not allowed to perform techniques. 1. Falling forward(2.3 age group) : from the front stand, fall forward onto your arms slightly bent and spread at the elbows and soften the blow by bending the elbows. Errors: fall onto straight arms extended forward; touching your knees to the floor (squatting on your knees); lifting off the feet (bending at the knees), hands at the moment of contact with the surface in front of the chest. 2. Falling backwards(2.3 age group) : from the front stance, squat closer to your heels, press your chin tightly to your chest, group (arms forward, palms down), rolling backwards on your back, make a pre-emptive strike straight, slightly hands spread on the ground, palms down, back “round”, legs bent, knees apart (if the enemy attacks, kick him towards him), jump up and prepare for battle. Errors: fall on a flat back, the chin is not pressed to the chest, the belay is performed by jumping onto a flat back, knees together, the angle between the arms and torso is more than 90°. 5. Shoulder somersault(2.3 age group): from the front (side) stand, lean forward and pass your left (right) hand between your legs, palm down, press your chin to your chest; pushing off with your feet, roll over your left (right) shoulder and back in the direction of your left (right) leg (buttock), jump up, and prepare to fight. Errors: stop on your side, touching the ground with your head. Grouping- sit on the ground and clasp your shins with both hands, spread your knees slightly, heels together, bend your torso, rounding your back, tilt your head, pressing your chin to your chest. Pulling your shins with your hands, bring your torso closer to your hips. Insurance actions (fall belay)
Conclusion of assessment for demonstration of safety actions "2" 2-2-2; 2-2-1 "1" 2-2-0; 2-1-1; 2-1-0; 1-1-1; 1-1-0 «0» 2-0-0; 1-0-0; 0-0-0 Hand-to-hand combat techniques. 1. Disarming the enemy when striking directly with a knife(2.3 age group) – beat the enemy’s armed hand inward with your forearm and grab him by the hand with both hands, kick him, arm lever out, disarm. Errors: 1. leaving the attack line was not completed 2. the “relaxation” kick was not performed 3. withdrawal was not performed after capturing the armed hand 4. lever of the hand outward (impact on the hand) is performed only with the hands without simultaneous rotation of the body 5. disarmament was not carried out 2. Disarming the enemy when striking with a knife from above(3 age group) – defend yourself by placing your forearm up under the opponent’s armed hand when swinging, grab the opponent’s forearm with the other hand, kick, carry out arm lever inward, disarm. Errors: 2. when performing an overhead block (“stand” with your hand), the elbow is higher than the level of the wrist 3. Disarming the enemy when struck with a knife from below(3 age group) – with a step forward, meet the enemy’s armed hand with the forearm resting down, grab the clothing at the elbow with the other hand, and kick in the groin or knee; conduct bend of the arm behind your back and disarm your enemy. Errors: 1. “entry” was not completed (approaching the enemy) 2. when performing a lower block (“stand” with your hand), the elbow is below wrist level 3. there is no grip of the forearm of the armed hand 4. the “relaxation” kick was not performed 5. lack of control of the opponent after bending the arm behind the back (unimpeded release is possible) 6. disarmament was not carried out 7. Lost control over the enemy before the “hang up” command 4. Release from the enemy’s grip of the neck from the front (clothes on the chest)(2.3 age group) – strike the opponent’s hand with the forearm from below, and grab it from above with the other hand; switching to a two-handed grab, kick and carry out arm lever inward. Errors: 1. the impact on the forearm is made only with the hands, without turning the body 2. when performing pressure on the forearm, control over the opponent’s hand is lost (the grip with the second hand is broken) 3. the “relaxation” kick was not performed 4. retreat after a kick was not performed 5. when levering the arm inward, there is no rotation of the body 6. Lost control over the enemy before the “hang up” command 5. Releasing from the enemy’s neck grab from behind(3 age group) – crouching, grab the opponent’s hand(s) and turn his head to the side; strike with your heel on the shin, with a sharp upward movement of your hands to free yourself from the grip; while holding the opponent's hand(s), hold throw through back(over the shoulder, over the shoulder from the knee), kick from below, take a painful hold. Errors: 2. not stepping to the side after delivering a kick 3. “relaxing” kick and stepping to the side is performed towards the opponent’s elbow 4. the opponent’s hand is not fixed before the throw 5. when throwing there is no work with the body (stretching with arms) 6. a painful hold was not performed 7. Lost control over the enemy before the “hang up” command 6. Release from the opponent’s grip of the body with hands behind(2.3 age group) – strike the enemy with a heel on the shin (foot) or with the back of the head in the face; crouching, free yourself from the grip, grab his hand with one hand by the forearm, the other by the shoulder, move back throw; kick, take in a painful hold. Errors: 1. a “relaxing” kick to the shin (foot) or the back of the head to the face was not performed 2. a “relaxing” kick was performed in the shin (foot) and with the back of the head in the face 3. not stepping to the side after delivering a kick (with the back of the head) 4. simultaneous capture of the opponent’s forearm and shoulder was not performed 5. there is no disruption of the grip when stepping back with the foot while simultaneously moving the body “down to the side” 6. the opponent’s hand is not fixed before the throw 7. when throwing there is no work with the body (stretching with arms) 8. a painful hold was not performed 9. Lost control over the enemy before the “hang up” command 7. Release from the enemy’s grip of the body from behind(3 age group) – strike with your heel in the shin, grab the opponent’s hand by the hand and elbow, turning, bend your arms behind your back. Errors: 1. the “relaxation” kick was not performed 2. no grip of the opponent’s hand and elbow 3. The lower hand is selected for the technique, which is fixed by the attacker with the upper hand 4. the impact on the hand is carried out without turning the body 5. the arm is not bent behind the back (escort) 6. lack of control of the opponent after bending the arm behind the back (possibly freeing the opponent) 7. Lost control over the enemy before the “hang up” command 8. Release from the opponent’s grip of the body with hands in front(2.3 age group) - strike with your knee or the edge of your palm in the groin, squatting, jerk your arms to the sides, grab your arm and torso, rear step, take on a painful hold. Errors: 1. a “relaxing” kick or head kick to the face was not performed 2. simultaneously performed a “relaxing” kick and head to the face 3. there is no disruption of the grip when stepping back with the foot 4. lost balance when throwing 5. no kick was thrown (when performing a front step) 6. Lost control over the enemy before the “hang up” command A set of unarmed hand-to-hand combat techniques for 8 counts. (exercise 30, 2, 3 age group) 1. Step forward with your left foot to prepare for battle. 2. Pound upward with your left forearm and strike straight forward with the fist of your right hand. 3. Kick your right foot straight forward. 4. With a step to the right, perform a backhand strike with the edge of the palm of your right hand. 5. Stepping back with your right foot, use your forearm to hit the inside with your left hand. 6. Step forward with your right foot and punch your right hand forward from above. 7. Perform a straight forward kick with your left foot and, without lowering your leg down, step forward with your left foot into a left-handed stance for the fight. 8. Take a marching stance with your left foot back. Personal errors: 1. the movements of the arms and the movement of the leg (step) forward when preparing for a fight are not synchronous 2. when performing an upswing with your hand, the elbow is above the level of the wrist; there is no return of the left hand (to the hip) when striking forward with the right hand (fist); punch not indicated 3. loss of balance when performing a kick; the kick is not indicated; “falling” forward during a strike is the same as placing your foot forward after performing a strike 4. a backhand strike (with the edge of the palm) performed with a straight hand; placing the foot to the side (to the right) and striking with the hand are not performed synchronously; full body turn to the right 5. hitting inward with the hand and stepping back (stepping) with the foot are not performed synchronously 6. the punch from above and the step forward with the foot are not performed synchronously; punch performed with a straight hand 7. loss of balance when performing a kick; kick not indicated “falling forward” during an impact is equivalent to placing the foot forward immediately after the impact; the movements of the legs and arms when preparing for battle are not synchronous 8. when taking a drill stance, your hands are not at your sides; drill not completed Command errors: Non-synchronous execution of the complex (“inconsistency”) Loss of orientation when performing (actions in different directions) Performing the complex with opposite hands (legs) Initial distance gap (across the width and depth of the formation) Leaving the court by team members before the referee's command A complex of hand-to-hand combat with a machine gun (carbine) for 8 counts. (exercise 31, 3rd age group) The starting position is a combat stance. 1. Step forward with your left foot into a fighting position. 2. Perform a punch to the right with the barrel of the machine gun and a thrust with a bayonet (poke with the barrel) with a lunge with the left foot. 3. Stepping back with your right foot, strike straight back with the butt plate. 4. Turning on your left foot to the right, with a step back with your right foot, hit the gun to the left with the barrel of the machine gun. 5. With a short step forward with your right foot, perform a side kick with the butt. 6. Turn in a circle over your left shoulder, putting your right leg back, protect yourself with the stand of the machine gun from a blow from below. 7. Step forward with your right foot, perform a straight strike with the magazine and a slash with the bayonet (barrel) from left to right. 8. Step back with your right foot and turn to the right to take a combat stance. Personal errors: Incorrect grip of the machine gun when preparing for battle · The tilt angle of the machine is less or more than 45° · There is no tapping with the barrel (bayonet) or the tapping is done with a swing · The shot with the barrel of the machine gun is made to the left · When performing a thrust with a bayonet, there is no lunge with the left leg (step forward) or there is no forward movement of the machine gun · Failure to step back with your right foot · The machine is located below head level or tilted downwards · Turn left Take a step with your left foot · Step and automatic return are performed separately · Instead of hitting with a machine gun, a go-ahead shot was made · The machine is at an angle of less than or more than 45° · The butt of the machine gun is below head level · The elbow of the right hand is pointed forward Step with left foot · Failure to step back with your right foot · The machine will not be held level (tilted on one side) · The machine magazine is directed downwards (or upwards) · The machine gun is held above the head · The construction stand is not completed · Take a step forward with your left foot to take a combat stance · When taking a combat stance, the machine gun is held with both hands group (team) errors · non-synchronous execution of the complex (“inconsistency”) · loss of orientation when performing (actions in different directions) · performing the complex with opposite hands (legs) · gap in the initial distance (across the width and depth of the formation) · team members leaving the court before the referee’s command Evaluation of the type “Hand-to-Hand Combat”
Hand-to-hand combat techniques (exercise No. 29)
Complexes of hand-to-hand combat techniques (exercise No. 30, 31)
LITERATURE · Manual on physical training and sports in the Armed Forces of the Russian Federation NFP-2009. Voenizdat. 2009. · Techniques and methods of action of a soldier in battle: a training manual. M.: Voenizdat, 1988. Video-methodological materials for performing the exercises are posted on the following websites: · CGPV "Baltic Coast" http://patriotcenter. ***** · Arts Development Club “Rising Star” http://***** II.Leading and conducting General management is carried out by the education department of the administration of the Primorsky district of St. Petersburg. The direct conduct of the competition is entrusted to the “Youth Creative Forum Kitezh Plus” (GOU DOD “Kitezh Plus”), assistance in the organization is provided by the Rising Star Arts Development Club. The main panel of judges is responsible for the preparation of sports facilities and compliance with safety measures during competitions. III. Time and place of the competition IV. Competition participants Teams of educational institutions, specialized military and cadet classes, students of military-patriotic, teenage and youth clubs, formations and associations take part in the competition. Team composition – 6 people: (at least 2 girls). The presence of spare students and additional leaders in the team is not allowed. Teams are distributed by age groups as follows: Notes: Team membership in a group is determined by the date of birth of the oldest student on the team. In teams of 2 and 3 age groups, no more than three students from younger age groups are allowed. The same student does not have the right to play for several teams. V.I Competition program. "Traffic Laws" Competition “Traffic Rules Experts” (1-3 groups, 6 people participating) (coefficient - 1.5) Theoretical exam on knowledge of the traffic rules of the Russian Federation, as amended by Decree of the Government of the Russian Federation No. 316 of May 10, 2010 (tickets of category “B”). Group 1 – with special tickets (part 1-5) (tickets are posted on the website of the city Center for Civic and Patriotic Education of the State Educational Institution of St. Petersburg “Baltic Coast” - www.patriotcenter.spb.ru in the “methodological recommendations” section). Group 2 – from 1 to 10 tickets Group 3 – from 1 to 15 tickets sections of the traffic rules: “general provisions”, “obligations of pedestrians and passengers”, “general obligations of drivers”. The team's result is determined by the sum of correctly answered questions. The control time for completing the stage is 10 minutes. If there are equal correct answers, preference is given to the team that spent the least time. ABC of road signs (1-3 groups, 6 people participating) Task on knowledge of road signs - name, group membership. The team receives a test task. Knowledge is tested on four types of signs: Prohibiting Prescriptive Information Warning The result of the command is determined by the sum of the correctly named characters. The control time for completing the stage is 10 minutes. If there are equal correct answers, preference is given to the team that spent the least time. 3 Figured cycling relay race (elements of the “Safe Wheel” competition) (1-3 groups, 4 people participating, 2 boys and 2 girls) (penalty table – Appendix 3) The competition is held on a site where obstacles are successively located at a distance of at least three meters from each other, the list of which is determined by a panel of judges. A participant on a bicycle overcomes an obstacle course. Refusal of one of the team members to complete this stage of the competition leads to disqualification of the team. When determining the winners, the fewest penalty points are taken into account. If there is a tie in points, advantage is given to the team that spent the least amount of time. V.II Competition program. HAND-HAND COMBAT Self-insurance by fall. Only after passing the self-insurance techniques, the participant is allowed to go through the next stages of the competition. If 3 or more team members fail the self-insurance techniques, the team is not allowed to proceed to the next stages. Self-insurance techniques protect against bruises on the ground during combat with an opponent. 1. Falling on the side(1,2,3 age group) : from the front pillar squat closer to your heels, press your chin tightly to your chest, stick your leg diagonally forward, roll onto your side while controlling your fall with the same arm extended at an angle of 45 degrees to your body. In this case, with your free hand you need to grab the collar of the clothing on the side opposite to this hand and press it tightly to the body. Errors: fall on a flat back, chin not pressed to the chest, the angle between the arms and torso is more than 90°, the free arm is not pressed to the body. 2. Falling backwards(1,2,3 age group) : from the front stance, squat closer to your heels, press your chin tightly to your chest, group (arms forward, palms down), rolling backwards on your back, make a pre-emptive strike straight, slightly hands spread on the ground, palms down, back “round”, legs bent, knees apart (if the enemy attacks, kick him towards him), jump up and prepare for battle. Errors: fall on a flat back, the chin is not pressed to the chest, the belay is performed by jumping onto a flat back, knees together, the angle between the arms and torso is more than 90°. 3. Shoulder somersault(1,2,3 age groups): from the front (side) stand, lean forward and pass your left (right) hand between your legs, palm down, press your chin to your chest; pushing off with your feet, roll over your left (right) shoulder and back in the direction of your left (right) leg (buttock), jump up, and prepare to fight. Errors: stop on your side, touching the ground with your head. 2. Hand-to-hand combat techniques (exercise 29, RB-3): 1. Disarming the enemy when striking directly with a knife– beat the enemy’s armed hand inward with your forearm and grab him by the hand with both hands, kick him, arm lever out, disarm. (2.3 age group) Errors: 1. leaving the attack line was not completed; 2. the “relaxing” kick was not performed; 3. withdrawal was not performed after capturing the armed hand; 4. lever of the hand outward (impact on the hand) is performed only with the hands without simultaneous rotation of the body; 5. disarmament was not carried out; 6. control over the enemy is lost before the “hang up” command. 2. Disarming the enemy when striking with a knife from above– defend yourself by placing your forearm up under the opponent’s armed hand when swinging, grab the opponent’s forearm with the other hand, kick, carry out arm lever inward, disarm. (3 age group) Errors: 2. when performing an upper block (“stand” with your hand), the elbow is higher than the level of the wrist; 3. Disarming the enemy when struck with a knife from below– with a step forward, meet the enemy’s armed hand with the forearm resting down, grab the clothing at the elbow with the other hand, and kick in the groin or knee; conduct bend of the arm behind your back and disarm your enemy. (3 age group) Errors: 1. “entry” (approach to the enemy) was not completed; 2. when performing a lower block (“stand” with your hand), the elbow is below the level of the wrist; 3. there is no grip of the forearm of the armed hand; 4. the “relaxation” kick was not performed; 5. lack of control of the opponent after bending the arm behind the back (unhindered release is possible); 6. disarmament was not carried out; 7. control over the enemy is lost before the “hang up” command; 4. Release from the enemy’s grip of the neck from the front (clothes on the chest)– strike the opponent’s hand with the forearm from below, and grab it from above with the other hand; switching to a two-handed grab, kick and carry out arm lever inward. (2.3 age group) Errors: 1. the impact on the forearm is made only with the hands, without turning the body; 2. when performing pressure on the forearm, control over the opponent’s hand is lost (the grip with the second hand is broken); 3. the “relaxation” kick was not performed; 4. the retreat after the kick was not performed; 5. when performing the arm lever inward, there is no rotation of the body; 6. control over the enemy is lost before the “hang up” command; 5. Releasing from the enemy’s neck grab from behind– crouching, grab the opponent’s hand(s) and turn his head to the side; strike with your heel on the shin, with a sharp upward movement of your hands to free yourself from the grip; while holding the opponent's hand(s), hold back throw(over the shoulder, over the shoulder from the knee), kick from below, take a painful hold. (3 age group) Errors: 2. did not step aside after delivering a kick; 3. a “relaxing” kick and stepping to the side is performed towards the opponent’s elbow (the neck grip is strengthened); 4. the opponent’s hand is not fixed before the throw; 5. when throwing, there is no work with the body (stretching with arms); 6. a painful hold was not performed; 7. Lost control over the enemy before the “hang up” command. 6. Release from the opponent’s grip of the body with hands behind– strike the enemy with a heel on the shin (foot) or with the back of the head in the face; crouching, free yourself from the grip, grab his hand with one hand by the forearm, the other by the shoulder, move back throw; kick, take in a painful hold. (2.3 age group) Errors: 1. a “relaxing” kick to the shin (foot) or the back of the head to the face was not performed; 2. a “relaxing” kick to the shin (foot) and the back of the head to the face was performed; 3. not stepping to the side after delivering a kick (with the back of the head); 4. simultaneous capture of the opponent’s forearm and shoulder was not performed; 5. there is no disruption of the grip when stepping back with the foot while simultaneously moving the body “down to the side”; 6. the opponent’s hand is not fixed before the throw; 7. when throwing, there is no work with the body (stretching with arms); 8. a painful hold was not performed; 9. Lost control over the enemy before the “hang up” command. 7. Release from the enemy’s grip of the body from behind– strike with your heel in the shin, grab the opponent’s hand by the hand and elbow, turning, bend your arms behind your back. (3 age group) Errors: 1. the “relaxing” kick was not performed; 2. no grip of the opponent’s hand and elbow; 3. the lower hand is selected for the technique, which is fixed by the attacker with the upper hand; 4. the impact on the hand is carried out without turning the body; 5. the arm is not bent behind the back (escorting); 6. lack of control of the opponent after bending the arm behind the back (unimpeded release is possible); 7. Lost control over the enemy before the “hang up” command. 8. Release from the opponent’s grip of the body with hands in front- strike with your knee or the edge of your palm in the groin, squatting, jerk your arms to the sides, grab your arm and torso, rear step, take on a painful hold. (2.3 age group) Errors: 1. a “relaxing” kick or edge of the palm was not performed; 2. a “relaxing” kick with the edge of the palm is performed; 3. the step to the side was not completed after delivering a kick (with the edge of the palm); 4. there is no disruption of the grip when stepping with the foot to the side while simultaneously moving the body “down”; 5. there is no spread of arms when the body goes “down”; 6. when performing a back trip: no stepping behind the opponent with the foot; there is no forward movement of the body (tilt) when placing the leg; straight legs after placing the leg behind the opponent; tilting the body back after planting the leg and carrying out the rear step; the rear step is made only with the help of hands (no body work); 7. a painful hold was not performed; 8. control over the enemy is lost before the “hang up” command. A set of unarmed hand-to-hand combat techniques for 8 counts. (exercise 30, 1,2,3 age groups) The starting position is a combat stance. 1. Step forward with your left foot to prepare for battle. 2. Pound upward with your left forearm and strike straight forward with the fist of your right hand. 3. Kick your right foot straight forward. 4. With a step to the right, perform a backhand strike with the edge of the palm of your right hand. 5. Stepping back with your right foot, use your forearm to hit the inside with your left hand. 6. Step forward with your right foot and punch your right hand forward from above. 7. Perform a straight forward kick with your left foot and, without lowering your leg down, step forward with your left foot into a left-handed stance for the fight. 8. Take a marching stance with your left foot back. Personal errors: 1. the movements of the arms and the movement of the leg (step) forward when preparing for a fight are not synchronous; 2. when performing an upswing with your hand, the elbow is above the level of the wrist; there is no return of the left hand (to the hip) when striking forward with the right hand (fist); punch is not indicated; 3. loss of balance when performing a kick; the kick is not indicated; “falling forward” during a strike is the same as placing the foot forward after performing a strike; 4. a backhand strike (with the edge of the palm) performed with a straight hand; placing the foot to the side (to the right) and striking with the hand are not performed synchronously; full turn of the body to the right; 5. hitting inward with the hand and stepping back (stepping) with the foot are not performed synchronously; 6. the punch from above and the step forward with the foot are not performed synchronously; the punch is made with a straight hand; 7. loss of balance when performing a kick; kick not indicated “falling forward” during an impact is equivalent to placing the foot forward immediately after the impact; the movements of the legs and arms when preparing for battle are not synchronous; 8. when taking a drill stance, your hands are not at your sides; the drill was not completed. Command errors: Non-synchronous execution of the complex (“inconsistency”); Loss of orientation when performing (actions in different directions); Performing the complex with opposite hands (legs); Gap in the initial distance (across the width and depth of the formation); Leaving the court by team members before the referee's command. Popular in the category:
© 2023 Sports portal - Kumuklar
|